السلام عليكم ورحمه الله وبركاته
كيفكم يا اخوانى
اليوم سوف اقوم بشرح كيفيه ارسال رساله او اميل عن طريق الـ Android
باستخدام الـ Default Email الخاص بك وهو غالبا ما يكون الـ Gmail او اميل اخر
لماذا اقول انه الـ Gmail لانك بكل بساطه عندما تقوم بالدخول على الـ Google Play Market
لابد من التسجيل باميلك على الـ Gmail وبعدها يكوون هو الاميل الرئيسى لك فالجهاز
دعنا نرى كيفية ذلك
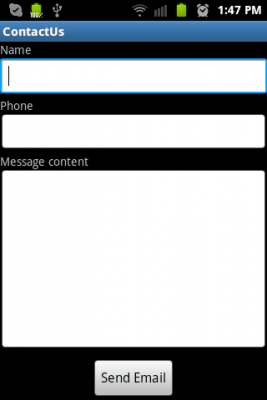
اولا سوف نقوم ببناء هذا الشكل من الـ UI الخاص بالتطبيق
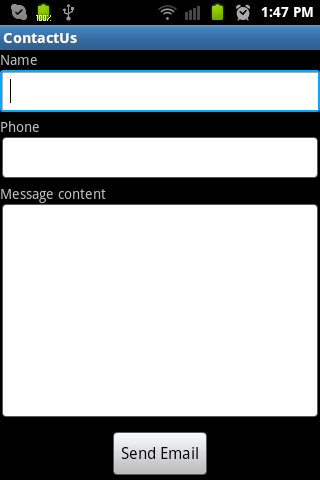
وهذا هو الكود الخاص بذلك وهو سهل جدا وبسيط
contactus.xml
<?xml version="1.0" encoding="utf-8"?>
<LinearLayout xmlns:android="http://schemas.android.com/apk/res/android"
	android:orientation="vertical"
	android:layout_width="fill_parent"
	android:layout_height="fill_parent"
	android:weightSum="100">
	<ScrollView
		android:layout_weight="90"
		android:layout_width="fill_parent"
		android:layout_height="wrap_content">
		<LinearLayout
		android:layout_width="fill_parent"
		android:layout_height="fill_parent"
		android:orientation="vertical">
			<TextView
				android:text="@string/name_text_view"
				android:layout_width="fill_parent"
				android:layout_height="wrap_content"/>
			<EditText
				android:id="@+id/name_edit_text"
				android:layout_width="fill_parent"
				android:layout_height="wrap_content"/>

			<TextView
				android:text="@string/phone_text_view"
				android:layout_width="fill_parent"
				android:layout_height="wrap_content"/>
			<EditText
				android:id="@+id/phone_edit_text"
				android:layout_width="fill_parent"
				android:layout_height="wrap_content"
				android:inputType="phone"/>

			<TextView
				android:text="@string/message_text_view"
				android:layout_width="fill_parent"
				android:layout_height="wrap_content"/>
			<EditText
				android:id="@+id/message_edit_text"
				android:layout_width="fill_parent"
				android:inputType="textMultiLine"
				android:layout_height="220dp"/>
		</LinearLayout>
	</ScrollView>

	<Button
		android:id="@+id/send_email_button"
		android:text="@string/send_email_button"
		android:layout_width="wrap_content"
		android:layout_height="wrap_content"
		android:gravity="center"
		android:layout_gravity="center"
		android:layout_weight="10"
	/>

</LinearLayout>
بعد ان قومنا ببناء الشكل السابق
نقوم ببناء الـ Activity الخاص بعرض هذا الـ layout والتعامل معه
ContactUsActivity.java
package com.jkelany.contactus;

import android.app.Activity;
import android.content.Intent;
import android.os.Bundle;
import android.view.View;
import android.widget.Button;
import android.widget.EditText;
import android.widget.Toast;

public class ContactUsActivity extends Activity implements View.OnClickListener {
	private String defaultEmail = "kelany@fci4all.com";
	private EditText nameEditText, phoneEditText, messageEditText;
	private Button sendEmailButton;

	@Override
	public void onCreate(Bundle savedInstanceState) {
		super.onCreate(savedInstanceState);
		setContentView(R.layout.contactus);
		inti();
	}

	private void inti() {
		nameEditText = (EditText) findViewById(R.id.name_edit_text);
		phoneEditText = (EditText) findViewById(R.id.phone_edit_text);
		messageEditText = (EditText) findViewById(R.id.message_edit_text);
		sendEmailButton = (Button) findViewById(R.id.send_email_button);

		sendEmailButton.setOnClickListener(this);
	}

	@Override
	public void onClick(View v) {
		String name = nameEditText.getText().toString();
		String phone = phoneEditText.getText().toString();
		String message = messageEditText.getText().toString();

		if (name == null || name.equals("")) {
			showToastMessage("Missing name");
		} else if (phone == null || phone.equals("")) {
			showToastMessage("Missing phone");
		} else if (message == null || message.equals("")) {
			showToastMessage("Missing message content");
		} else {
			sendMessage(name, phone, message);
		}
	}

	private void sendMessage(String name, String phone, String message) {
		String fullMessage = "Hello , I\'m " + name + "\n"
				+ "My phone number :" + phone + "\n" + "My messsage : \n"
				+ message + "\n\n\n,thanks.";

		Intent sendEmailIntent = new Intent(android.content.Intent.ACTION_SEND);
		sendEmailIntent.setType("plain/text");

		sendEmailIntent.putExtra(android.content.Intent.EXTRA_EMAIL,
				new String[] { defaultEmail });
		sendEmailIntent.putExtra(android.content.Intent.EXTRA_SUBJECT,
				"Contact JKelany");
		sendEmailIntent
				.putExtra(android.content.Intent.EXTRA_TEXT, fullMessage);

		startActivity(sendEmailIntent);
	}

	private void showToastMessage(String txt) {
		Toast.makeText(this, txt, Toast.LENGTH_LONG).show();
	}
}
فى هذا الـ Activity سوف نقوم بعمل مرجعيه للـ EditText & Button لكى يمكننا ذلك من التعامل معه فى كود الجافا
nameEditText = (EditText) findViewById(R.id.name_edit_text);
		phoneEditText = (EditText) findViewById(R.id.phone_edit_text);
		messageEditText = (EditText) findViewById(R.id.message_edit_text);
		sendEmailButton = (Button) findViewById(R.id.send_email_button);
بعد ان نقوم بذلك نقوم بعمل الحدث الخاص بالضغط على الزرار sendEmailButton وفى هذا الحدث
نقوم بعمل فحص بسيط على الحقول هى فارغة ام لا لكى نتأكد من البيانات مدخله بشكل صحيح قبل البدا فى عملية الارسال
@Override
	public void onClick(View v) {
		String name = nameEditText.getText().toString();
		String phone = phoneEditText.getText().toString();
		String message = messageEditText.getText().toString();

		if (name == null || name.equals("")) {
			showToastMessage("Missing name");
		} else if (phone == null || phone.equals("")) {
			showToastMessage("Missing phone");
		} else if (message == null || message.equals("")) {
			showToastMessage("Missing message content");
		} else {
			sendMessage(name, phone, message);
		}
	}
اذا ظهر ان احد الحقول فارغة سوف يقوم بظهور رساله صغيره بما تسمى الـ Toast لكى تعلم المستخدم انه نسى الحقل هذا
اما اذا تخطت الشروط كلها فانه بعد ذلك يقوم باستدعاء داله معرفه مسبقا لدى باسم sendMessage
	private void sendMessage(String name, String phone, String message) {
		String fullMessage = "Hello , I\'m " + name + "\n"
				+ "My phone number :" + phone + "\n" + "My messsage : \n"
				+ message + "\n\n\n,thanks.";

		Intent sendEmailIntent = new Intent(android.content.Intent.ACTION_SEND);
		sendEmailIntent.setType("plain/text");

		sendEmailIntent.putExtra(android.content.Intent.EXTRA_EMAIL,
				new String[] { defaultEmail });
		sendEmailIntent.putExtra(android.content.Intent.EXTRA_SUBJECT,
				"Contact JKelany");
		sendEmailIntent
				.putExtra(android.content.Intent.EXTRA_TEXT, fullMessage);

		startActivity(sendEmailIntent);
	}
وهذه الداله هى التى سوف نقوم بشرح ما بداخلها لان هذا هو الشىء الجديد فى الموضوع
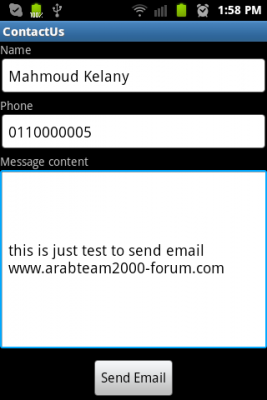
المتغير fullMessage يحتوى على الرساله التى سوف ارسالها للشركه وهى تحتوى على رساله ومن ضمن محتوياتها
اسم المرسل ورقم التليفون والتعليق الذى يريد ان يراسل الشركه من أجله
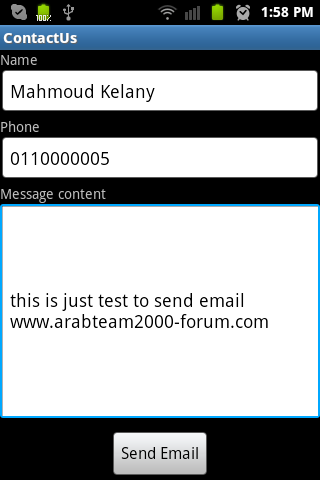
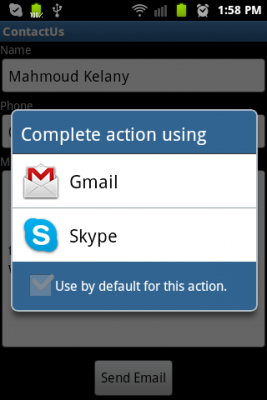
بعد ذلك نقوم بعمل كائن من Intent وهذا الكائن يقوم باستخدام حدث موجود بالفعل فى الـAndroid وهى عمليه ارسال الاميل
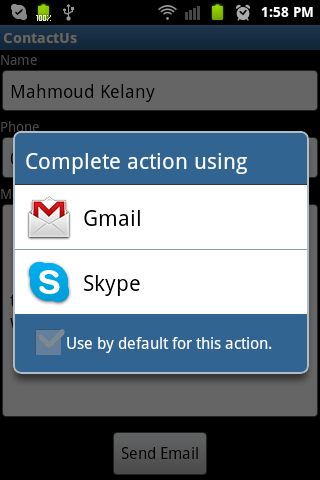
ويقوم بالبحث عن جميع الاميلات او خدمات الاميلات ان صح التعبير لكى يظهرها لك وتختار من بينها ما تريده
كما هو موضح بالصوره
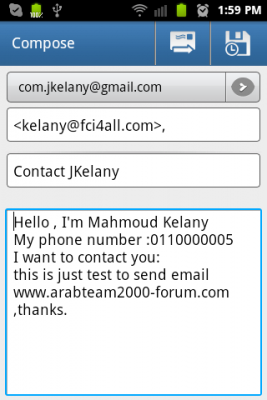
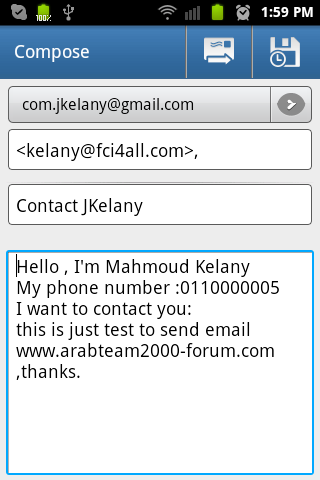
بعد ان تقوم باختيار الخدمه التى تريد الارسال عن طريقها وليكن الـ Gmail
يقوم بعد ذلك بظهور الشاشه التاليه ليظهر لك شكل الرساله والى من يتم ارساله ومن من ونص الرساله
ما عليك بعدها الا ان تقوم بالضغط على زرار Send
لكن كيف وصلت جميع البيانات الى مكانها الصحيح من التطبيق الخاص بك الى تطبيق الـ Gmail
وهنا يأتى دور الملحقات التى تم وضعها فالـ Intent قبل ارسالها
sendEmailIntent.putExtra(android.content.Intent.EXTRA_EMAIL, new String[] { defaultEmail });
		sendEmailIntent.putExtra(android.content.Intent.EXTRA_SUBJECT, "Contact JKelany");
		sendEmailIntent.putExtra(android.content.Intent.EXTRA_TEXT, fullMessage);
EXTRA_EMAIL تدل على الى من سوف يتم ارسال هذه الرساله لكن لاحظ جيدا ان عليك وضع الاميل على هيئه مصفوفه String هكذا
sendEmailIntent.putExtra(android.content.Intent.EXTRA_EMAIL, new String[] { defaultEmail });اذا وضعتها بدون مصفوفه هكذا فلن تعمل
sendEmailIntent.putExtra(android.content.Intent.EXTRA_EMAIL, defaultEmail );
EXTRA_SUBJECT هو عنوان الرساله
EXTRA_TEXT وهو الرساله كامله التى كنا مسبقا وضعناها فى المتغير fullMessage
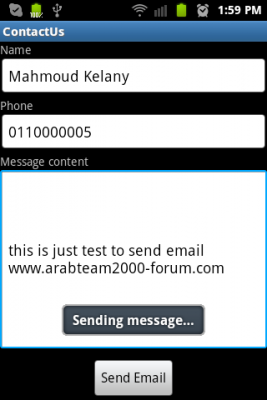
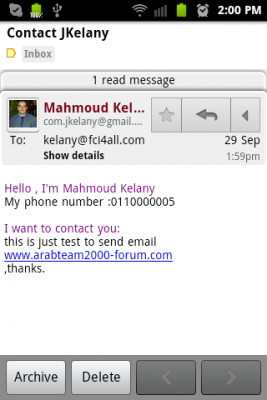
وسوف تصل الرساله للاميل المرسله اليه بعد الضغط على زر Send
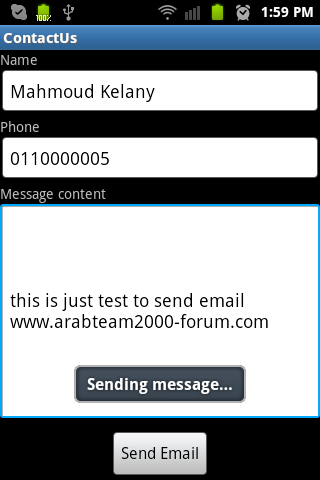
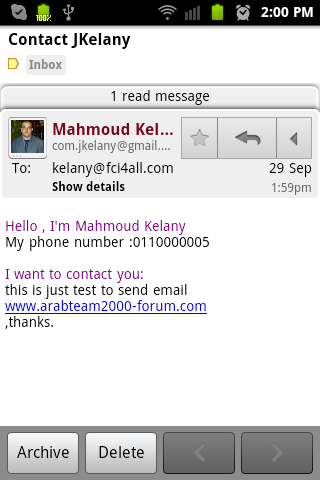
وها قد وصلت الرساله الى الاميل التى ارسلتها اليه
لتحميل كود المشروع
بالتوفيق ان شاء الله