السلام عليكم ورحمة الله وبركاته
هناك ٢٥ إضافة جديدة في HTML5 التي أعرفها و يمكنني أفادتكم بها:
أولا:New Doctype
قديما كنا نكتب doctype بهذا الشكل :
<!DOCTYPE html PUBLIC "-//W3C//DTD XHTML 1.0 Transitional//EN"
    "http://www.w3.org/TR/xhtml1/DTD/xhtml1-transitional.dtd">
ولكن الآن ستكفي لو كتبتها بهذا الشكل:
<!DOCTYPE html>
ثانياً:The Figure Element
في الماضي كنا نكتب الكود بهذا الشكل وهو صحيح أيضاً حتى الآن:
<img src="path/to/image" alt="About image" />
<p>Image of Mars. </p>
و لكن بعد إضافة هذه الإضافة أصبحت كتابة الكود بهذا الشكل بمحض الإفتراض:
<figure>
	<img src="path/to/image" alt="About image" />
	<figcaption>
		<p>This is an image of something interesting. </p>
	</figcaption>
</figure>
للمزيد من المعرفة من هذا الرابط : http://www.w3schools.com/html5/tag_figure.asp
ثالثا:<small> Redefined
هذه الإضافة جميلة و مريحة من الستايل نوعاً ما وهي قبل كتابة الكلمة تعطيها :
<small>bla bla bla </small>
فيصبح الكلام صغيراً
رابعاً: Scripts and Links
في الماضي كنا نكتب التالي لكي نعرف إسم JS الموجود أو الCSS في الصفحة :
<link rel="stylesheet" href="path/to/stylesheet.css" type="text/css" />
<script type="text/javascript" src="path/to/script.js"></script>
بصراحة الجملة صويله نوعاً ما و أيضاً تعريفها لكن الآن أصبح كالتالي:
<link rel="stylesheet" href="path/to/stylesheet.css" />
<script src="path/to/script.js"></script>
خامساً: الإقتباس أو عدم الأقتباس : To Quote or Not to Quote
بإمكانك تسكير ال Tag الموجود أو عدم تسكيره كالتالي:
<p class=myClass id=someId> Start the reactor.
سادساً: Make your Content Editable هذه الإضافة في غاية الروعه دون اللجوء إلى الجافا سكريبت وهي كالتالي:
<!DOCTYPE html>

<html lang="en">
<head>
	<meta charset="utf-8">
	<title>untitled</title>
</head>
<body>
	<h2> To-Do List </h2>
     <ul contenteditable="true">
		<li> Break mechanical cab driver. </li>
		<li> Drive to abandoned factory
		<li> Watch video of self </li>
	 </ul>
</body>
</html>
يمكن لأي شخص آن يعدل على الكلام الموجود شيء رائع بالفعل.
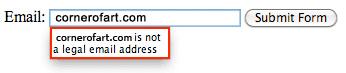
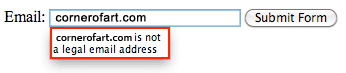
سابعاً:Email Inputs هذه الإضافة جميله أيضاً دون اللجوء لل PHP or ASP وهي كالتالي:
<!DOCTYPE html>

<html lang="en">
<head>
	<meta charset="utf-8">
	<title>untitled</title>
</head>
<body>
	<form action="" method="get">
		<label for="email">Email:</label>
		<input id="email" name="email" type="email" />

		<button type="submit"> Submit Form </button>
	</form>
</body>
</html>
الصورة التوضيحية:
ثامناً: النيابة بالإيميل: وهي Placeholders
هذه الميزة مريحة جدا في بعض الأمور وهي كالتالي:
<input name="email" type="email" placeholder="me@cornerofart.com" />
تاسعاً: تعريف الهدر و الفوتر وهي The Semantic Header and Footer
في السابق كنا نعرف الهيدر عن طريق الDiv و بإستخدام class أو id كالتالي:
<div id="header">
	...
</div>

<div id="footer">
	...
</div>
ولكن الآن أصبح كالتالي:
<header>
	...
</header>

<footer>
	...
</footer>
عاشراً: Internet Explorer and HTML5 تعريف explorer لقديم على html5
كان في الماضي كالتالي:
header, footer, article, section, nav, menu, hgroup {
   display: block;
}
أما الآن أصبح التالي بإمكانك إضافت الهذه الميزة عليها:
document.createElement("article");
document.createElement("footer");
document.createElement("header");
document.createElement("hgroup");
document.createElement("nav");
document.createElement("menu");
و تركيب الرابط التالي في الصفحة:
<!--[if IE]>
<script src="http://html5shim.googlecode.com/svn/trunk/html5.js"></script>
<![endif]-->
الحادي عشرة: hgroup
هذه الميزة يمكنك القراءة عنها هنا أيضاً: http://www.w3schools.com/html5/tag_hgroup.asp
و أما الكود فهو كالتالي:
<header>
	<hgroup>
		<h1> Recall Fan Page </h1>
		<h2> Only for people who want the memory of a lifetime. </h2>
	</hgroup>
</header>
الثاني عشرة: السمة المطلوبة: Required Attribute
بإمكانك كتابتها بهذا الشكل :
<input type="text" name="someInput" required>
لكن لأكثر توضيح بهذا الشكل:
<input type="text" name="someInput" required="required">
مثال:
<form method="post" action="">
	<label for="someInput"> Your Name: </label>
	<input type="text" id="someInput" name="someInput" placeholder="Douglas Quaid" required>
	<button type="submit">Go</button>
</form>
الصورة التوضيحية: 
الثالث عشرة: الضبط التلقائي للسمة :Autofocus Attribute
وهي كالتالي :
<input type="text" name="someInput" placeholder="Douglas Quaid" required autofocus>
الرابع عشرة: Audio Support
وهي كالتالي :
<audio autoplay="autoplay" controls="controls">
	<source src="file.ogg" />
	<source src="file.mp3" />
	<a href="file.mp3">Download this file.</a>
</audio>
الخامس عشرة : Video Support
كنا نعاني من هذه الميزة قديماً قبل تسهيها و الآن أصبحت بهذه السهولة :
<video controls preload>
	<source src="cohagenPhoneCall.ogv" type="video/ogg; codecs='vorbis, theora'" />
	<source src="cohagenPhoneCall.mp4" type="video/mp4; 'codecs='avc1.42E01E, mp4a.40.2'" />
	<p> Your browser is old. <a href="cohagenPhoneCall.mp4">Download this video instead.</a> </p>
</video>
السادس عشرة: Preload Videos
شيء جميل بالفعل و تنص على الآتي:
<video preload>
بس تخيل :blink:
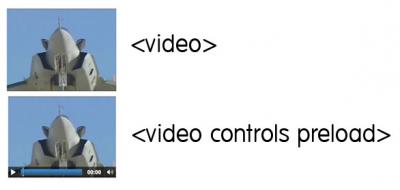
السابع عشرة:Display Controls للفيديو:
<video preload controls>
مع هذه الإضافة يضهر لك جميع الأمور التي تتحكم بالفيديو من الصوت و التقديم و الترجيع و إيقافه و غيرها من الأمور.
صورة توضيحية: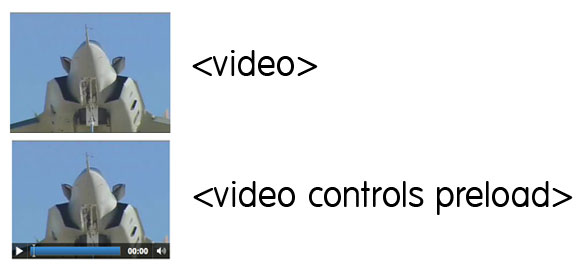
الثامن عشرة:Regular Expressions
هي كالتالي:
<form action="" method="post">
	<label for="username">Create a Username: </label>
   	<input type="text"
	   name="username"
	   id="username"
	   placeholder="4 <> 10"
	   pattern="[A-Za-z]{4,10}"
	   autofocus
	   required>
	<button type="submit">Go </button>
</form>مثال:regex.zip
التاسع عشر: الكشف عن دعم السمات Detect Support for Attributes
وهي كالتالي:
يصح بهذه الطريقة :
alert( 'pattern' in document.createElement('input') ) // boolean;بدلا من هذه الطريقة:
<script>
if (!'pattern' in document.createElement('input') ) {
    // do client/server side validation
}
</script>
العشرون: علامة عنصر معين Mark Element
بهذه الخاصية يمكنك أن تظلل الكلمة التي تريد للمشاهد قرآدتها:
<h3> Search Results </h3>
<p> They were interrupted, just after Quato said, <mark>"Open your Mind"</mark>. </p>
الحادي و العشرون : بإمكانك إستخدام التالي كما تستخدم ال div :
* header
*article
*section
*footer
الثاني و العشرون هي عبارة عن معلومة سريعه:
ما هو الغير html5
* SVG
*CSS3
*Geolocation
*Client Storage
*Web Sockets
الثالث و العشرون: The Data Attribute
<h1 id=someId customAttribute=value> Thank you, cornrofart. </h1>
مثال: HTML
<div id="myDiv" data-custom-attr="My Value"> Bla Bla </div>
JS:
var theDiv = document.getElementById('myDiv');
var attr = theDiv.getAttribute('data-custom-attr');
alert(attr); // My Val
المثال بالشكل الكامل:
<!DOCTYPE html>

<html lang="en">
<head>
   <meta charset="utf-8">
   <title>Sort of Lame CSS Text Changing</title>
<style>

h1 { position: relative; }
h1:hover { color: transparent; }

h1:hover:after {
	content: attr(data-hover-response);
	color: black;
	position: absolute;
	left: 0;

}
</style>
</head>
<body>

<h1 data-hover-response="I Said Don't Touch Me!"> Don't Touch Me  </h1>

</body>
</html>
لرؤيته Online
الرابع و العشرون: إخراج العنصر The Output Element أي النتيجة :
<form action="" method="get">
	<p>
		10 + 5 = <output name="sum"></output>
	</p>
	<button type="submit"> Calculate </button>
</form>

<script>
(function() {
	var f = document.forms[0];

	if ( typeof f['sum'] !== 'undefined' ) {
		f.addEventListener('submit', function(e) {
			f['sum'].value = 15;
			e.preventDefault();
		}, false);
	}
	else { alert('Your browser is not ready yet.'); }
})();
</script>
الصورة التوضيحية:
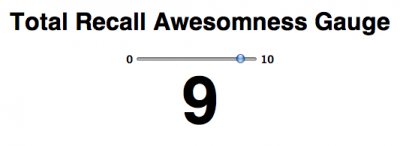
الخامس و العشرووووووون و أخيراً : Create Sliders with the Range Input عمل شريط سفلي.
<input type="range">
وهو كالمثال التالي:
<form method="post">
    <h1> Total Recall Awesomness Gauge </h1>
    <input type="range" name="range" min="0" max="10" step="1" value="">
    <output name="result">  </output>
</form>
لا ننسى ال CSS :
body {
	font-family: 'Myriad-Pro', 'myriad', helvetica, arial, sans-serif;
	text-align: center;
}
input { font-size: 14px; font-weight: bold;  }

input[type=range]:before { content: attr(min); padding-right: 5px; }
input[type=range]:after { content: attr(max); padding-left: 5px;}

output {
	display: block;
	font-size: 5.5em;
	font-weight: bold;
}
طبعاً لابد من وجود ال JS
(function() {
	var f = document.forms[0],
		range = f['range'],
		result = f['result'],
		cachedRangeValue = localStorage.rangeValue ? localStorage.rangeValue : 5;

	// Determine if browser is one of the cool kids that
	// recognizes the range input.
	var o = document.createElement('input');
	o.type = 'range';
	if ( o.type === 'text' ) alert('Sorry. Your browser is not cool enough yet. Try the latest Opera.');

	// Set initial values of the input and ouput elements to
	// either what's stored locally, or the number 5.
	range.value = cachedRangeValue;
	result.value = cachedRangeValue;

	// When the user makes a selection, update local storage.
	range.addEventListener("mouseup", function() {
		alert("The selected value was " + range.value + ". I am using local storage to remember the value. Refresh and check on a modern browser.");
		localStorage ? (localStorage.rangeValue = range.value) : alert("Save data to database or something instead.");
	}, false);

	// Display chosen value when sliding.
	range.addEventListener("change", function() {
		result.value = range.value;
	}, false);

})();
الصورة التوضيحية:
الصورة التوضيحية الثانية: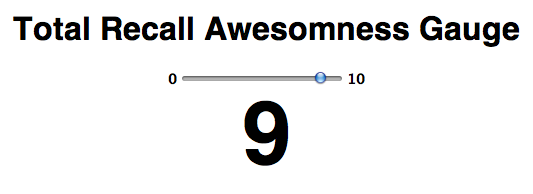
وهيك بكون خلصت هذا الدرس و المعلومات الكثيرة و القيمة و الله يعطيني العافيه :)
إذا كان هناك أي أخطاء لغوية الرجاء أن تعذروني فهذه من السرعه و الشكر.