الفريق العربي للبرمجةأرشيف المنتديات · 2000 – 2023
نسخة أرشيفية للقراءة فقط — التسجيل والمشاركة مغلقان، والمحتوى محفوظ كما كان.

مشكل بعد اضافة واجهة html الى pagemaster

بدأه Dev_life في 18 يوليو 2010 · 4 رد · 568 مشاهدة · في ASP.NET
مشاركة: واتساب X فيسبوك تيليجرام
#1 صاحب الموضوع

السلام عليكم

اخواني الأفاضل

واجهت هدا المشكل مند أكتر من تلاتة أسابيع ولم أتمكن من معرفة المشكل بالضبط

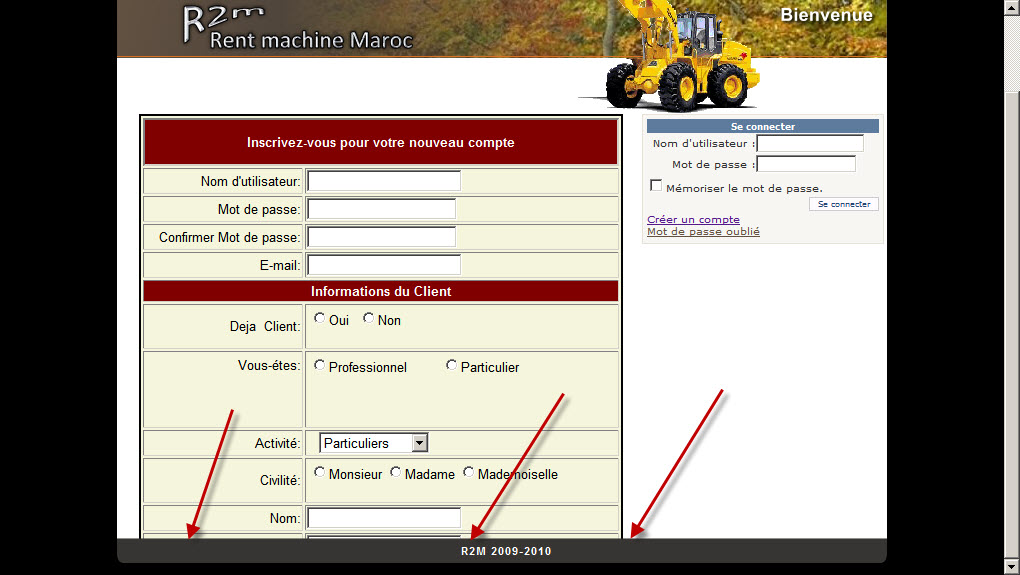
بكل اختصار الصورة تشرح الأمر

المشكل بعد ام قمت بعمل template ببرنامج xara web designer واردت استعمالها بموقعي

ظهر خلل بالصفحات الاخرى حيت لاتظهر المكونات عند تجاوزي آخر الصفحة

المشروع يوضح الأمر.

المشروع

او

4shared

post-225671-098852100 1279484627_thumb.j

المرفقات
18-07-2010 21-17-08.jpg

تم تعديل هذه المشاركة بواسطة Dev_life في 18 يوليو 2010 في 23:29

#2

القالب بحاجة الى اعادة هيكلة لانو معقد كتير وفيه زيادة حشو كتير يبدو انك كنت تحدثف من دون ان تعرف ماذا تحذف بكل الاحوال كما اخبرتك به حشو كثير جدا

المشكلة هي بال position:absolute

اي بحاجة الى صيانة كاملة من البداية

تم تعديل هذه المشاركة بواسطة X-File في 19 يوليو 2010 في 00:06

In bad state

#3

السلام عليكم

شكرا اخي X-File على اجابتك

الا يمكن التعديل على الصفحة الأصل ببرنامج xara؟؟

ولم أفهم معنى حشو؟؟

#4

السلام عليكم

بصراحة اسلوب كتابتك للCSS يسبب كثير للمشاكل لانه لا يمكنتتبع الخطأ

وبعد ساعة كاملة من القراءة والمتابعة وبصراحة برامج التصميم للcss لا تتيح لك الاريح بالتعديل على الديزين فللذك قم بالتصمم بنفسك أفضل (رأي الخاص)

نصيحة سمي اسماء في ملف css تكون مفهموه لديك اي (header ,footer,body,left,right,login fourm,Register fourm )

حتى يتسنى لك معرفة اين الخطأ

الخطأ أنه أمك الهيدر والفوتر الخاص بالديزن في نفس div

<img class="xr_ap" src="index_htm_files/2.png" alt="" id="Repeating:58LegalFooter" title="" style="left: 0px; top: 615px; width: 770px; height: 26px;"/>

top:615 هنا الخطأ لانك هنا عامل postion :absloute

<img class="xr_ap" src="index_htm_files/0.png" alt="" title="" style="left: -2px; top: -2px; width: 784px; height: 654px;"/>

هذه ابالخصائص التي وضعتها لن تتمدد

نصيحة استخدم هذا css حيث يفصل بين كل منطقة

ومن ثم ضع الذي أكوادك في الاماكن المناسبة

<!DOCTYPE html PUBLIC "-//W3C//DTD XHTML 1.0 Transitional//EN" "http://www.w3.org/TR/xhtml1/DTD/xhtml1-transitional.dtd">
<html xmlns="http://www.w3.org/1999/xhtml">
<head>
<meta http-equiv="Content-Type" content="text/html; charset=utf-8" />
<title>Untitled Document</title>
<style type="text/css">
<!--
body {
font: 100%/1.4 Verdana, Arial, Helvetica, sans-serif;
background: #4E5869;
margin: 0;
padding: 0;
color: #000;
}

/* ~~ Element/tag selectors ~~ */
ul, ol, dl { /* Due to variations between browsers, it's best practices to zero padding and margin on lists. For consistency, you can either specify the amounts you want here, or on the list items (LI, DT, DD) they contain. Remember that what you do here will cascade to the .nav list unless you write a more specific selector. */
padding: 0;
margin: 0;
}
h1, h2, h3, h4, h5, h6, p {
margin-top: 0;  /* removing the top margin gets around an issue where margins can escape from their containing div. The remaining bottom margin will hold it away from any elements that follow. */
padding-right: 15px;
padding-left: 15px; /* adding the padding to the sides of the elements within the divs, instead of the divs themselves, gets rid of any box model math. A nested div with side padding can also be used as an alternate method. */
}
a img { /* this selector removes the default blue border displayed in some browsers around an image when it is surrounded by a link */
border: none;
}

/* ~~ Styling for your site's links must remain in this order - including the group of selectors that create the hover effect. ~~ */
a:link {
color:#414958;
text-decoration: underline; /* unless you style your links to look extremely unique, it's best to provide underlines for quick visual identification */
}
a:visited {
color: #4E5869;
text-decoration: underline;
}
a:hover, a:active, a:focus { /* this group of selectors will give a keyboard navigator the same hover experience as the person using a mouse. */
text-decoration: none;
}

/* ~~ this container surrounds all other divs giving them their percentage-based width ~~ */
.container {
width: 80%;
max-width: 1260px;/* a max-width may be desirable to keep this layout from getting too wide on a large monitor. This keeps line length more readable. IE6 does not respect this declaration. */
min-width: 780px;/* a min-width may be desirable to keep this layout from getting too narrow. This keeps line length more readable in the side columns. IE6 does not respect this declaration. */
background: #FFF;
margin: 0 auto; /* the auto value on the sides, coupled with the width, centers the layout. It is not needed if you set the .container's width to 100%. */
}

/* ~~the header is not given a width. It will extend the full width of your layout. It contains an image placeholder that should be replaced with your own linked logo~~ */
.header {
background: #6F7D94;
}

/* ~~ This is the layout information. ~~ 

1) Padding is only placed on the top and/or bottom of the div. The elements within this div have padding on their sides. This saves you from any "box model math". Keep in mind, if you add any side padding or border to the div itself, it will be added to the width you define to create the *total* width. You may also choose to remove the padding on the element in the div and place a second div within it with no width and the padding necessary for your design.

*/
.content {
padding: 10px 0;
}

/* ~~ This grouped selector gives the lists in the .content area space ~~ */
.content ul, .content ol { 
padding: 0 15px 15px 40px; /* this padding mirrors the right padding in the headings and paragraph rule above. Padding was placed on the bottom for space between other elements on the lists and on the left to create the indention. These may be adjusted as you wish. */
}

/* ~~ The footer ~~ */
.footer {
padding: 10px 0;
background: #6F7D94;
}

/* ~~ miscellaneous float/clear classes ~~ */
.fltrt {  /* this class can be used to float an element right in your page. The floated element must precede the element it should be next to on the page. */
float: right;
margin-left: 8px;
}
.fltlft { /* this class can be used to float an element left in your page. The floated element must precede the element it should be next to on the page. */
float: left;
margin-right: 8px;
}
.clearfloat { /* this class can be placed on a <br /> or empty div as the final element following the last floated div (within the #container) if the #footer is removed or taken out of the #container */
clear:both;
height:0;
font-size: 1px;
line-height: 0px;
}
-->
</style></head>

<body>

<div class="container">
  <div class="header"><a href="#"><img src="" alt="Insert Logo Here" name="Insert_logo" width="20%" height="90" id="Insert_logo" style="background: #8090AB; display:block;" /></a> 
	<!-- end .header --></div>
  <div class="content">
	<h1>Instructions</h1>
	<p>Be aware that the CSS for these layouts is heavily commented. If you do most of your work in Design view, have a peek at the code to get tips on working with the CSS for the liquid layouts. You can remove these comments before you launch your site. To learn more about the techniques used in these CSS Layouts, read this article at Adobe's Developer Center - <a href="http://www.adobe.com/go/adc_css_layouts">http://www.adobe.com/go/adc_css_layouts</a>.</p>
	<h2>Layout</h2>
	<p>Since this is a one-column layout, the .content is not floated. </p>
	<h3>Logo Replacement</h3>
	<p>An image placeholder was used in this layout in the .header where you'll likely want to place  a logo. It is recommended that you remove the placeholder and replace it with your own linked logo. </p>
	<p> Be aware that if you use the Property inspector to navigate to your logo image using the SRC field (instead of removing and replacing the placeholder), you should remove the inline background and display properties. These inline styles are only used to make the logo placeholder show up in browsers for demonstration purposes. </p>
	<p>To remove the inline styles, make sure your CSS Styles panel is set to Current. Select the image, and in the Properties pane of the CSS Styles panel, right click and delete the display and background properties. (Of course, you can always go directly into the code and delete the inline styles from the image or placeholder there.)</p>
	<!-- end .content --></div>
  <div class="footer">
	<p>Footer</p>
	<!-- end .footer --></div>
  <!-- end .container --></div>
</body>
</html>

تحياتي

تم تعديل هذه المشاركة بواسطة EMNALI في 19 يوليو 2010 في 13:09

وَعَبْدٌ قَدْ يَنامُ عَلَى حَرِيرٍ ××× وَذُو نَسَبٍ مَفَارِشُهُ التُّرَابُ

#5

أخي EMNALI

أشكرك كتيرا على تعاونك معي

لقد سبق وحاولت تصميم صفحتي لكن لا أملك الخبرة الكافية لدلك ااضافة لدلك واجهت مشاكل بعد التقطيع حيت اني استعمل photoshop /fireworks

الا انهما يعتمدان على tag table التي أجد دائما معها مشاكل جمة

حيت اني ادا نقلت صفحتي الى جهاز آخر فان الصفحة تظهر بأبعاد اخرى ويحدت بها اخطاء

وقد سمعت انه من الأفضل استعمال tag div

الا اني لم اود التصميم بنفسي فاستعملت برنامج xara web designer لانه يستعمل في تصميمه للصفحات tag div الا ان المشكل الوحيد الدي بقي لدي هو المشكل الدي بالصورة

حاولت مع التصميم الدي وضعته لكن الامر يأخد وقتا اضافة لدلك الأمر معقد كتيرا

لا أقصد بدلك انني اسعتمد الجاهز لكن في الوقت الحالي لم يعد لدي الوقت الكافي لاعادة تصميم صفحة أخرى سوى يومان لموعد التسليم قبل الاختيار حيت أدرس .

الا يمكنك نصحي ببرنامج ىخر غير xara مع أني سأحاول مرة اخرى مع template اخرى لربما يكون هناك اختلاف

أشكرك جزيلك الشكر أخي EMNALI على دراستك للمشكل .

مواضيع مشابهة