الفريق العربي للبرمجةأرشيف المنتديات · 2000 – 2023
نسخة أرشيفية للقراءة فقط — التسجيل والمشاركة مغلقان، والمحتوى محفوظ كما كان.

كيفية جعل صورة تتحرك لفترة معينة

بدأه mr.beshoy في 8 أبريل 2010 · 5 رد · 666 مشاهدة · في JavaSE
مشاركة: واتساب X فيسبوك تيليجرام
#1 صاحب الموضوع

هنا يا إخوة أواجه مشكلة إنى بعد أن وضعت صورة على بانل أريد هذه الصورة أن تتحرك تحرك رأسياً لإسفل على طول المحور Y

جربت طرق كثيرة و لكن دون جدوى و هذه الأخيرة بإستعمال ال Timer

ظناً منى عندما أحدد الزمن أنها ستتحرك فى هذا الزمن . لكن دون جدوى

import java.awt.Dimension;
import javax.swing.JFrame;
import javax.swing.JPanel;

public class TestGame extends JFrame {

    private JPanel panel;
    private MainPanel mainPanel;

    public TestGame() {
        setDefaultCloseOperation(JFrame.EXIT_ON_CLOSE);
        setSize(new Dimension(600, 300));
        setLocationRelativeTo(null);
        setExtendedState(MAXIMIZED_BOTH);
        setVisible(true);
        ////////////////////////////////////////////////
        panel = new JPanel();
        getContentPane().add(panel);
        panel.setLayout(null);
        mainPanel = new MainPanel(this);
        panel.add(mainPanel);
    }

    public static void main(String[] args) {
        new TestGame();
    }
}

import java.awt.Color;
import java.awt.Dimension;
import java.awt.Graphics;
import java.util.Timer;
import java.util.TimerTask;
import javax.swing.ImageIcon;
import javax.swing.JPanel;

class MainPanel extends JPanel {

    private int x, y, x_Speed, y_Speed;
    private ImageIcon imageIcon;

    public MainPanel(TestGame testGame) {
        setPreferredSize(new Dimension(200, 400));
        setSize(getPreferredSize());
        System.out.println(getPreferredSize());
        x = testGame.getWidth() / 2 - getWidth() / 2;
        y = testGame.getHeight() / 2 - getHeight() / 2;
        setLocation(x, y);
        setBackground(Color.YELLOW);
        ///////////////////////////////////////////////////////////////
        imageIcon = new ImageIcon(getClass().getResource("F.png"));
    }

    @Override
    protected void paintComponent(Graphics g) {
        super.paintComponent(g);
        drawingShape(g);
        moveingShape_Y(g);
    }

    private void drawingShape(Graphics g) {
        x = 10;
        y = 10;
        g.drawImage(imageIcon.getImage(), x, y, this);
    }

    private void moveingShape_Y(final Graphics g) {
        x = 10;
        y = 10;
        Timer timer = new Timer();
        timer.schedule(new TimerTask() {

            @Override
            public void run() {
                g.drawImage(imageIcon.getImage(), x, y, MainPanel.this);
            }
        }, 10);
    }
}

و مرفق أيضاً

----------------------------------------------------------------------------

قولوا لى على طريقة التفكير أى الخطوات المتبعة و أنا سأحوال أحولها ل code

حتى اعملها بنفسى ، و إذا وجدت صعوبة سأوافيكم ..شكراً لكم

Game.rar

تم تعديل هذه المشاركة بواسطة mr.beshoy في 8 أبريل 2010 في 19:40

#2

استخدم حزمة المحرك !

#3
import java.awt.Color;
import java.awt.Dimension;
import java.awt.Graphics;
import java.awt.event.ActionListener;
import java.awt.event.ActionEvent;
import javax.swing.Timer;
import javax.swing.ImageIcon;
import javax.swing.JPanel;

class MainPanel extends JPanel implements ActionListener {

	private int x, y, x_Speed, y_Speed;
	private ImageIcon imageIcon;
	private Timer timer;

	public MainPanel(TestGame testGame) {
		setPreferredSize(new Dimension(200, 400));
		setSize(getPreferredSize());
		System.out.println(getPreferredSize());
		x = testGame.getWidth() / 2 - getWidth() / 2;
		y = testGame.getHeight() / 2 - getHeight() / 2;
		setLocation(x, y);
		setBackground(Color.YELLOW);
		///////////////////////////////////////////////////////////////
		imageIcon = new ImageIcon(getClass().getResource("F.png"));
		x = 10;
		y = 10;
		timer = new Timer(400, this);	//execute the actionPerformed method each 400 ms
		timer.start();
	}

	public void actionPerformed(ActionEvent e) {
		y += 10;
		repaint();
	}

	@Override
	protected void paintComponent(Graphics g) {
		super.paintComponent(g);
		drawingShape(g);
	}

	private void drawingShape(Graphics g) {
		g.drawImage(imageIcon.getImage(), x, y, this);
	}
}
#4

أستاذنا speed_of_light لا أريد أن استعمل هذه الحزمة و فى يقينى أنى أستطيع من خلال اللغة نحل المشكلة .

و تتسهل إن شاء الله و أطلع عليها .

--------------------------------------------------------------------------------------------------------------------------------

أخ JustPassing شكراً لمساهمتك .. استفدت منها جيداً .

----------------------------------------------------------------------------------------------

كنت أريد عندما تصل الصورة لنهاية ال panel الصفراء تقف الصورة ففعلت هذا :

        move_Y += 10;
        repaint();
        if (move_Y > 330) {
            timer.stop();
        }

و نجحت و لكن عندما كتبت

if (move_Y > getPreferredSize().height)

لم تقف . لماذا ؟!!

---------------------------

المشكلة الأخرى كنت أريد أثناء التحرك على مدار محور Y ، و ضغطت من خلال ال KeyBoard على زر الإتجاه الإيمن أو الإيسر تتحرك الصورة .

فعلت هذا :

    private void move_At_X_direction(KeyEvent e) {
        location = e.getKeyLocation();
        if (location == KeyEvent.KEY_LOCATION_RIGHT) {
            move_X += 10;
            repaint();
        }
    }

و لكن لم يتأثر بضغطة الزر . لماذا ؟!

-------------------------------------------------------------

ال class المعدل :

import java.awt.Color;
import java.awt.Dimension;
import java.awt.Graphics;
import java.awt.event.ActionListener;
import java.awt.event.ActionEvent;
import java.awt.event.KeyEvent;
import java.awt.event.KeyListener;
import javax.swing.Timer;
import javax.swing.ImageIcon;
import javax.swing.JPanel;

class MainPanel extends JPanel implements ActionListener, KeyListener {

    private int x, y, move_X, move_Y, location;
    private ImageIcon imageIcon;
    private Timer timer;

    public MainPanel(TestGame testGame) {
        setPreferredSize(new Dimension(200, 400));
        setSize(getPreferredSize());
        System.out.println(getPreferredSize().height);
        x = testGame.getWidth() / 2 - getWidth() / 2;
        y = testGame.getHeight() / 2 - getHeight() / 2;
        setLocation(x, y);
        setBackground(Color.YELLOW);
        ///////////////////////////////////////////////////////////////
        move_X = 10;
        move_Y = 10;
        imageIcon = new ImageIcon(getClass().getResource("F.png"));
        timer = new Timer(400, this); //execute the actionPerformed method each 400 ms
        timer.start();
    }

    public void actionPerformed(ActionEvent e) {
        move_At_Y_direction();

    }

    @Override
    protected void paintComponent(Graphics g) {
        super.paintComponent(g);
        drawingShape(g);
    }

    private void drawingShape(Graphics g) {
        g.drawImage(imageIcon.getImage(), move_X, move_Y, this);
    }

    private void move_At_Y_direction() {
        move_Y += 10;
        repaint();
        if (move_Y > getPreferredSize().height) {
            timer.stop();
        }
    }

    public void keyTyped(KeyEvent e) {
    }

    public void keyPressed(KeyEvent e) {
        move_At_X_direction(e);
    }

    public void keyReleased(KeyEvent e) {
    }

    private void move_At_X_direction(KeyEvent e) {
        location = e.getKeyLocation();
        if (location == KeyEvent.KEY_LOCATION_RIGHT) {
            move_X += 10;
            repaint();
        }
    }
}

-----------------

و مرفق أيضاً بأكمله .

شكراً لتعبكم

Game.rar

تم تعديل هذه المشاركة بواسطة mr.beshoy في 9 أبريل 2010 في 04:54

#5

حسب ما فهمت من رسالتك إنك شغال على لعبة Tetris

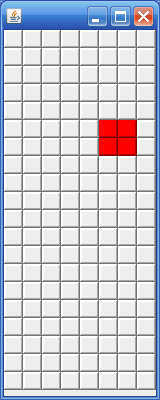
بالنسبة لهذه اللعبة بالذات، هناك طريقة أفضل من استخدام الصور وهي عمل GridLayout بعدد النقاط الموجودة عندك وإضافة JPanel بلون مختلف داخل كل نقطة.

مرفق كود يوضح الموضوع

/*
 * To change this template, choose Tools | Templates
 * and open the template in the editor.
 */

package playground;

import java.awt.Color;
import java.awt.Container;
import java.awt.GridLayout;
import javax.swing.BorderFactory;
import javax.swing.JFrame;
import javax.swing.JPanel;
import javax.swing.border.BevelBorder;

/**
 *
 * @author Yasser
 */
public class Main extends JFrame{

    int rows, columns;
    JPanel[][] panes;
    public Main(int rows, int columns){
        this.rows = rows;
        this.columns = columns;

        GridLayout g = new GridLayout(rows, columns);
        Container con = getContentPane();
        con.setLayout(g);

        setDefaultCloseOperation(EXIT_ON_CLOSE);
        setSize(columns * 20, rows * 20);

        panes = new JPanel[rows][columns];

        for(int i = 0; i < rows; i++){
            for(int j = 0; j < columns; j++){
                panes[j] = new JPanel();
                con.add(panes[j]);
                panes[j].setBorder(BorderFactory.createBevelBorder(BevelBorder.RAISED));
            }
        }


        //draw a cube
        panes[5][5].setBackground(Color.red);
        panes[5][6].setBackground(Color.red);
        panes[6][5].setBackground(Color.red);
        panes[6][6].setBackground(Color.red);

        setVisible(true);
    }

    /**
     * @param args the command line arguments
     */
    public static void main(String[] args) {
        // TODO code application logic here
        new Main(20, 8);
    }

}

والنتيجة كالتالي

post-64788-12707892142285_thumb.png

#6

أسف جداً على تأخرى بالدرد ... أنا مكنتش ناسى بس ظروف معلش يا باشمهندس ياسر .

فكرة جيدة ، و طبقتها على الكود خاصتنا .

و لكن أعتقد سنواجه متاعب أكثر فى طريقتك هذه.

سأوفيك بكل جديد اواجه .

شكراً

تم تعديل هذه المشاركة بواسطة mr.beshoy في 12 أبريل 2010 في 03:40

مواضيع مشابهة